I've got a 20% discount, so will be ordering a batch quite soon at around £24 plus postage, if anyone is interested now would be the time to give me a shout!
xxxx
Wednesday, 11 April 2012
Wednesday, 7 March 2012
Ginger and banana cake
Oh dear, so it turns out after all that work that the cookbook costs £30 to print a copy!! Back to the drawing board on that front methinks....unless anyone wants to buy a £30 gluten-free cookbook? Let me know if you do and I'll sort out a copy for you.
In the meantime, I shall go back to posting cake recipes (and others) on here :-)
This recipe makes a nice loaf-like cake, best served covered with lovely butter!


In the meantime, I shall go back to posting cake recipes (and others) on here :-)
This recipe makes a nice loaf-like cake, best served covered with lovely butter!

Ingredients:
3 medium or 2 large bananas
200g ground almonds
150g rice flour
2 eggs
100g sugar
100g butter
4 tbsp black treacle
1 tbsp ground ginger
1 tbsp baking powder
Preheat the oven to 180°C (350°F/GM4).
Break up the bananas into big chunks and blend in a food processor until the fruit is a smooth paste.
Next, add the baking powder, ground ginger, ground almonds, rice flour and eggs to the banana and mix well.
Place the sugar, butter and treacle into a separate glass bowl and heat gently (hob or microwave) until the butter has melted and the treacle has softened. You don't need the sugar to dissolve. Mix well and then add this to the rest of the mixture.
Give it all a final good mix and then turn it into a greased and lined loaf tin. Bake for 45 to 60 minutes, at 180°C (350°F/GM4). Cool thoroughly on a wire tray before slicing.

Tuesday, 24 January 2012
The cookbook is coming....
It's a race between getting the cookbook finished and starting back to work next week, but the book is nearly there! Just awaiting a few finishing touches....keep an eye out for it
Sunday, 13 November 2011
The Completed Collection
Thought I'd stick up some photos of the completed collection - they've now all arrived safe and sound in NZ.

I may have taken a small amount of artistic licence with the trout colours:
Rainbow trout

and Brown trout


two lambs, two goats.....

two piggies, and one hen


I may have taken a small amount of artistic licence with the trout colours:
Rainbow trout

and Brown trout


two lambs, two goats.....

two piggies, and one hen

Thursday, 3 November 2011
How to make a goat
A step-by-step guide to making your own little goat :-)

Step 1. Make a rectangular block out of your base colour (orange). Round the edges slightly. Add the tail.


Step 2. Make 4 equal size cylinders out of dark brown for the legs. Stick one at each corner.
Step 3. Choose a light colour for the undercoat (white).
Make long strands by rolling out by hand, making sure one end is tapered.

Start at the back end of the goat, wrapping the first strands round and under the tail.
Keep applying the strands as shown, working forwards. Do the same on the other side of the goat, with a straight line down the back. Make the strands long enough that they mostly cover the body (although don't worry about them being the same length - goats are scruffy!)

Keep going until the whole body is covered - I call this the 'headless ghost-goat' stage :-)

Step 4. Give your headless goat a collar - colour of your choice!
 Step 5. Time to make a head. Make two cylinder shapes, of equal width but with your base colour (orange) longer than the nose (pink). Place the two cylinders together and roll until they join together smoothly.

Stick the head onto the goat, on top of the collar - I find the collar helps hold the head in place more securely
 Step 6: Make the ears by rolling a long sausage shape and flattening the middle part (where it will sit on the head). Round the ends and flatten slightly to give the ears their long, flappy shape....and....
 ...stick them on the head. Place the flattened central section round the back of the head. Shape the ear flaps to give them a little curve
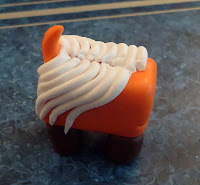
 Step 7: Time to start on the top coat. Alternate strands of different colours (light and dark brown). Start with two short strands going down below the tail (got to give him a little dignity) ....
.....keep going.....
 ...and going....
until....
....you reach the front, where.....
 .... you can give him an extra, shorter layer - over his chest

Step 8: Make the horns, and stick them on the head
 Step 9: Add the facial characteristics - nostrils, eyes, and a big smile :-)
 Step 10: Time for the funky hair do!
Start at the back of the head, with a row of hair long enough to reach his back
 then add another, slightly shorter row. Start to work around to the front of the head.

give him a fringe, with strands going out in all directions. Send some out over his horns, curling round underneath. He's ended up with a little circular bald patch...keep going...
 ....till its all filled in. The last few strands are the hardest, but they end up going in all directions.
 Last step: add the goatee under the chin!

And introduce him to his friends!

Step 1. Make a rectangular block out of your base colour (orange). Round the edges slightly. Add the tail.


Step 2. Make 4 equal size cylinders out of dark brown for the legs. Stick one at each corner.
Step 3. Choose a light colour for the undercoat (white).
Make long strands by rolling out by hand, making sure one end is tapered.

Start at the back end of the goat, wrapping the first strands round and under the tail.

Keep applying the strands as shown, working forwards. Do the same on the other side of the goat, with a straight line down the back. Make the strands long enough that they mostly cover the body (although don't worry about them being the same length - goats are scruffy!)

Keep going until the whole body is covered - I call this the 'headless ghost-goat' stage :-)

Step 4. Give your headless goat a collar - colour of your choice!


Stick the head onto the goat, on top of the collar - I find the collar helps hold the head in place more securely


.....keep going.....

until....
....you reach the front, where.....


Step 8: Make the horns, and stick them on the head


Start at the back of the head, with a row of hair long enough to reach his back


give him a fringe, with strands going out in all directions. Send some out over his horns, curling round underneath. He's ended up with a little circular bald patch...keep going...


And introduce him to his friends!
Sunday, 30 October 2011
Walnut Cake
Another cake recipe, to pass the time while you wait for the cook book to be completed...
This started life as a walnut and coffee cake, but evolved into just a walnut cake, albeit with rather nice icing


This started life as a walnut and coffee cake, but evolved into just a walnut cake, albeit with rather nice icing

Ingredients:
For the cake –
75g walnut pieces
150g ground almonds
3 eggs
100g melted butter
100g sugar
50ml water
(or 30ml water and 20ml walnut oil)
1 tsp baking powder
For the middle -
100g butter
30g icing sugar
2 capfuls of Baileys
For the top -
250g mascapone
15-30g icing sugar
1 tsp vanilla essence
Preheat the oven to 180°C (350°F/GM4).
The cake:
Place the walnuts with the ground almonds in a food processor and blitz until the walnut pieces have turned to a similar consistency to the almonds – some small chunks is fine, and you will have some darker flecks from the walnut skins too (see the photo below). Place in a bowl and add the melted butter, sugar, baking powder and eggs. Mix well. Mix in the coffee a bit at a time, until it is all added. Divide the mixture between two round (diameter) greased and lined baking tins and bake in a preheated oven at 180°C (350°F/GM4) for 25 minutes, until golden brown on top. Remove and allow to cool in the tins.

The middle:
Mix the ingredients together. Place one cake on the plate it will be served on, and spread the Baileys butter icing on the top. Carefully place the second cake on top of the icing.
The top:
Mix the ingredients together (add sugar to taste). Spread the icing all over the top of the cake and down the sides. Finish off with some whole walnuts to decorate the top.

If you fancied coffee and walnut, you could easily adapt this recipe by adding a little coffee essence to the mix....
Thursday, 8 September 2011
Hazelnut, orange and chocolate biscuits
Wasn't sure whether to post this, since I'm now writing a cook book (of sorts...) and wondered whether I should keep the new recipes to myself....but this is too yummy not to share, and quite similar to my previous biscuit recipes so here it is:
70g melted butter
mix in: 30-50g sugar (to taste)
100g ground almonds
1 egg yolk
15g chopped roasted hazelnuts
1 tsp orange essence
25g dark chocolate chips
1/2 tsp gluten-free baking powder
mix it all together - it should form one big lump or ball in your bowl once thoroughly mixed. Divide into 16 equal sized bits, roll into balls and place on a greased and lined baking tray. I don't squish these at all, just leave them as balls:

Bake in a prewarmed oven at 160C (325F/GM3) for 20 minutes. Allow to cool on the tray before removing. Keep these in an airtight container and they keep for a couple of days then go soggy (they're still nice, but not as crunchy) ... saying that, they don't last that long in this house anyway....

Subscribe to:
Posts (Atom)